Cut Tool
The purpose of the Cut tool is to split a large clip up into a number of smaller sub-clips such that each sub-clip is a continuous take, i.e. contains no edits, fades, transitions etc... For example, if a whole reel of film has been scanned and imported into PFClean as a single clip; then the Cut tool must be used to split this up into a number of smaller sub-clips, one sub-clip per edit as a minimum.
Cutting up a clip into separate continuous takes serves 2 main purposes:
it makes the clip more manageable, especially in the above example of a whole reel of film being imported as a single clip!
certain clean up operations, in particular the optical flow used for dirt/dust/scratch detection, require there to be no edits in the clip being processed. (Optical flow compares the differences between adjacent frames and if there is an edit in the clip being processed, such that adjacent frames do not relate to the same scene, then the calculations can produce invalid results).
Additionally the Cut tool can be used to further sub-divide an already continuous take into a number of smaller sections if this is desirable to the user, for example, to make a long continuous take more manageable, or if the different sections require different cleanup operations on them.
Cutting up a clip into sub-clips is one of the first actions you should take after importing a clip into the system, and it certainly must be done before you start any cleanup work.
Cuts in a clip can be detected automatically, manually, or a mixture of both.
Loading a clip into the Cut tool
To load a clip into the Cut tool go to the Media Bin, select the clip you want to cut and click the Cut button, shown below, located in the lower-left-hand corner:

The tools area will now show the Cut tool:

The Cut tool consists of 4 areas which are, from left to right:
The Clip controls - this area shows the clip being worked upon with a Done button to unload the clip from the Cut tool.
The Detection controls - this area controls the automatic detection of cuts in the clips.
The cuts list - this area lists the cuts in the clip with a Commit All/Commit Item buttons to commit to the cuts that are listed (described later) and .
The Preview area - this area aids in verifying that the cuts are in the correct place.
Automatic cut point detection
To automatically analyse the clip for cut points simply press the Detect button. As the cut detection runs, the Detect button changes to an Abort button and a percentage completion figure is displayed above the button. As cut points are found the cuts list, described later, is populated. The user is free to review and commit to these cuts even while the cut detection is still running. Alternatively, the user is free to switch to a different tool and work on something else while the cut detection runs in the background.
Detection methods
The automatic analysis can use 3 different criteria to identify cut points. These 3 criteria, which can be used in any combination, are:
Image content - adjacent frames are analysed and, if their content differs significantly, a cut point is assumed to occur.
Timecode - a discontinuity in the timecode information between adjacent frames is assumed to be a cut point.
Edgecode - a discontinuity in the edgecode information between adjacent frames is assumed to be a cut point.
Specify which method(s) you wish to use by the check-boxes above the Detect button before running the automatic detection.
Not all image formats have timecode and/or edgecode information embedded within them. If this information is not available for a particular clip then the relevant options are disabled. Image content analysis is always available.
Where applicable it is usually quicker to look for cut points based on timecode and/or edgecode discontinuities since this only involves minimal processing of the frame headers and not a detailed analysis of the full resolution frame content itself. However, just because a clip has timecode/edgecode information present does not automatically mean it can be used to detect edit points since such information may have been overwritten at some earlier point in the scanning/preparation of the clip resulting in the the original discontinuities being lost.
In order to use the timecode embedded within a clip it is imperative that the frame rate of the project into which the clip is imported matches the frame rate used in the timecode. If there is a mismatch, say the clip's timecode is based on 25fps but its imported into a 24fps project, then the timecode of some frames will be invalid. If this occurs then the automatic detection of the edit points will abort.
It is also possible to read in cut point from an EDL file by pressing the EDL button.
The Cut list
As the cut point detection runs the cuts that have so far been found are listed in the cuts list:
The blue markers in the scrub bar, here at frames 31 and 61, show the cut points have been identified at those frames.
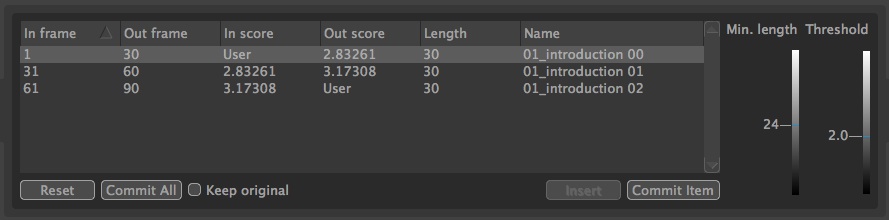
The cuts list details the sub-clips that will be created if the current set of cut points is committed to; specifically it lists the in and out frames, the score of these (described below), and the sub-clip length and name.
Initially the sub-clips names are an arbitrary default value, click on the name field of an already selected item in the list to edit the name and enter something more meaningful.
The score fields detail the confidence with which the Cut tool believes that a cut point exists at that frame - the higher the score, the greater the confidence. Use the Threshold slider to change the above which the Cut tool considers the score to be a cut point - decreasing the Threshold slider helps to pick up more subtle edit points but risks accidentally mis-classifying a frame as an cut point.
The Min length slider sets a minimum frame length for the sub-clips. Note that changes to these slider are automatically reflected in the cuts list - no re-analysis of the clip is necessary. Selecting any sub-clip in the cuts list jumps to the in frame of that sub-clip in the Cinema. Similarly, the relevant sub-clip is always highlighted in the cuts list as the clip is played back and scrubbing through.
The Preview area
To the right of the cuts list is the Preview area which shows a number of frames for the sub-clip selected in the cuts list. The preview area can be used to determine if the the cut points have been correctly located.
The preview area shows the in and out frames of the sub-clip selected in the cuts list (left image):
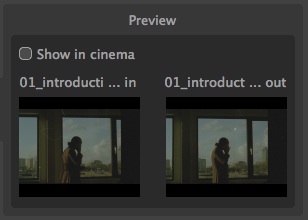
When the Show in cinema checkbox is ticked these 2 frames along with the frames before and after are overlaid in the Cinema display. This feature is useful, for example, when a 2nd monitor is being used to display the Cinema.
Manual cut point detection
Cut points may be manually identified by navigating to the appropriate frame and pressing the Insert button to add a cut point. If a cut point already exists at that frame the buttons text changes to Remove and the cut point is deleted.
This Insert/Remove button can be used to both correct the automatically detected edit points and to manually cut up a clip.
Committing to the cuts
Cuts can be committed to either individually or all at once.
If you are happy that all of the sub-clips listed in the cuts list are correct, press the Commit All button to create the sub-clips. This button has to be pressed twice to confirm the action. The main GUI area should revert back to the Timeline showing the clip you have just cut replaced by the sub-clips. This new sequence contains the sub-clips correctly inserted into it in such a way that it exactly mimics the original clip. This sequence clip can be viewed into the Timeline, or exported, for when you need to see the sub-clips in context. However, its important to remember that whilst this sequence clip outwardly has the same appearance as the original clip it is, in fact, a collection of numerous independent smaller clips each of which can be worked upon individually and in isolation.
Alternatively, select a single item in the cuts list and press the Commit Item button to create the sub-clip for just that item. When committing to a single cut its entry in the cuts list remains but is greyed out and its score shown as Commit. Furthermore, you can not change the in point of the cut that follows an item that has been committed to nor the out point of the item that proceeds it, since otherwise a gap or overlap would be introduced and this would be in contradiction of the already committed to item.
The use of these buttons can be mixed in that you can commit to a couple of individual cuts using Commit Item before then committing to the rest using Commit All. Such a workflow is typical if you have a large clip to cut and you wish to start work on the first few sub-clips identified by the cut detection while it processes the rest of the clip in the background.
The Keep original check-box controls whether the newly created sub-clips should replace the original clip or be in addition to it. Note: if you do not keep the original clip then once the sub-clips have been created there is no way of reverting back to the original clip - so make sure the cuts list is correct before committing to it. Sub-clips are created in the same scene as the original clip.