


Mask panel

The Mask button in the Effect Stack Manager brings up the mask controls. Masks are used to control how different effects are applied to the clip, and can restrict the operation of any effect to certain pixels in the image. Masks can be activated and deactivated in different effects and can be animated over time.

When masks are created, they are activated in the current effect by default. Alternatively, masks can also be created in the base clip and then activated where necessary in other effects. Deactive masks are greyed-out in the mask list.
When creating a new mask, if a mask is already selected, the new mask will be added as a child. Child masks can have boolean operations associated with them which affect the way they combine with their parent. Note that only one level of child masks can be created: it is not possible to add a child mask to another child mask.
Masks can also be attached to trackers to speed up the process of animating them over time.
Creating Masks
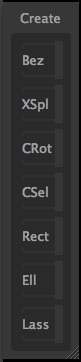
To create a new mask, click one of the mask buttons:
When a new mask is created, it will be added to the Mask List, and activated in the current effect (unless the mask is created in the base clip, in which case it will not be activated).
Bez (Bezier Roto): to create a Bezier roto-spline. Click with left mouse button to place roto vertices in Cinema. Dragging the mouse whilst placing a vertex will expose Bezier handles, and releasing the mouse button will place the handles. After placing all vertices, click on first vertex to close the roto-spline and generate the mask.
XSpl (X-Spline mask): to create an X-Spline mask, click the X-Spline button and then click with the left mouse button in the main image window to place vertices. To close the mask, click on the first vertex again. X-Spline handles are available to control the tension and thickness at each control point.
CRot (Colour Roto): to create a colour-based roto mask. These are different from normal roto masks because they use colour information to estimate the correct mask value at each pixel between the inner and outer boundary edges. These can be used to quickly construct a mask around the edge of an object without the need to carefully animate the mask boundary in each frame.
CSel (Colour Selection mask): to create a selection mask that can be used to identify a coloured region. The spatial and colour support of the mask can be adjusted interactively in the cinema window.
Rect (Rectangle): to create a rectangular mask. Click with left button and drag the mouse to place the rectangle. Once the mouse is released, the rectangle will be converted into a roto-spline to generate the mask.
Ell (Ellipse): to create a elliptical mask. Click with left button and drag the mouse to place the ellipse. Once the mouse is released, the ellipse will be converted into a roto-spline to generate the mask.
Lass (Lasso): to create a lasso mask. Click with left button and drag the mouse to draw a lasso. Once the mouse is released, the lasso will be converted into a roto-spline to generate the mask.
Clip-Based Masks
Masks can also be generated from grey-scale or colour images or clips by dragging a clip out of the media bins and dropping it into the mask list. The Media Bins can be accessed by pressed the button shown below:

After a clip-based mask has been created, clicking the right mouse button on the clip name will allow the source channel to be changed:

This is the channel from which the mask gets its information. Available options are Red, Green, Blue, Alpha (only if the clip contains an alpha channel) and Luminance, which will convert the RGB image to grey-scale to use as a mask.
Editing Masks
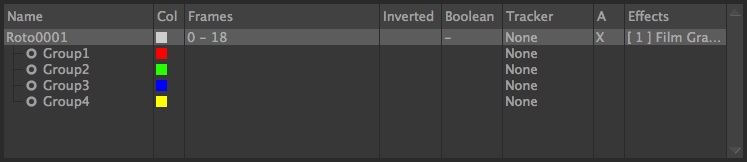
Click on a mask in the Mask List to select it for editing. All masks have their boundaries drawn in the cinema, but only the currently selected mask will be shaded, The current mask can be renamed by double-clicking in the Name column with the left mouse button. The mask list also displays the Colour of the boundary, the Frames in which the mask is present, whether the mask is Inverted, its Boolean operation, the Tracker it is attached to, and the Effects in which that mask is active.
Double-clicking in the Colour column will display a colour chooser window for editing the colour of the mask boundary.
To change the boolean operation for a child mask, right-click in the Boolean column to display a pop- up menu. Boolean operations are Add, Subtract, Intersect and Exclude. Similarly, attaching a mask to a tracker is achieved by right-clicking in the Tracker column and choosing a tracker from the pop-up list.
Clicking the A column will activate or deactivate the selected mask in the current effect, where it will be used to limit how the effect manipulates the image data. An A in this column indicates wether the mask is active in the current effect (To change the current effect quickly, use the Up/Down cursor keys).
Clicking the All/None button will select all or none of the masks in the list at the same time. The Invert Mask button will invert only the selected mask. To make a separate copy of the selected mask, click the Duplicate button. The Group button can be used to group vertices together for easier editing (see below). Clicking the Delete button will delete all selected masks. Note that when a mask is deleted, it is removed from all effects in which it is active.
Clicking the In and Out Buttons will set the in/out point to the current frame accordingly. Masks will only be active for frames within this range.
To toggle display of masks boundaries in the Cinema, click the Show Boundaries button. Clicking the Show Handles and Show Outer buttons will toggle display of the spline handles and outer mask boundary for roto-splines.
The Colour button and opacity edit box can be used to adjust the shaded overlay that is drawn for the selected mask. Note that mask opacity does not affect how much each pixel is masked: it is used only for display purposes.
Editing Spline-Based Masks
Once a spline-based mask is selected for editing, clicking the Insert Points button will allow additional vertices to be added to the boundary. Clicking with the left mouse button will insert a new vertex into both the inner and outer mask boundaries. Dragging the mouse before releasing the left button will allow the vertex to be placed more accurately.
Right-clicking on a Bezier roto vertex in the main image window will display a context menu allowing the vertex to be changed from linear to Bezier. Options are also available to change the vertex group, or delete the vertex from the mask.
The R-, Remove Key, and R+ buttons can be used to remove vertex keyframe positions from the mask. Clicking R- will remove all earlier keyframes, and R+ will remove all later keyframes. Clicking Remove Key will remove keyframes at the current frame only.
The K- and K+ buttons can be used to quickly move to the previous or next frame that contains a keyed vertex.
The thickness edit box (labelled T.) can be used to change the thickness of the gap between the inner and outer mask boundaries (by default, this is zero for everything except for colour-based roto masks) and create a soft-edged mask:
This value is measured in units of pixels, so entering 10 into this edit box will set the thickness of the selected mask to 10 pixels in all directions. Setting this to zero will revert back to a hard-edged mask by placing the outer boundary at the same position as the inner boundary.
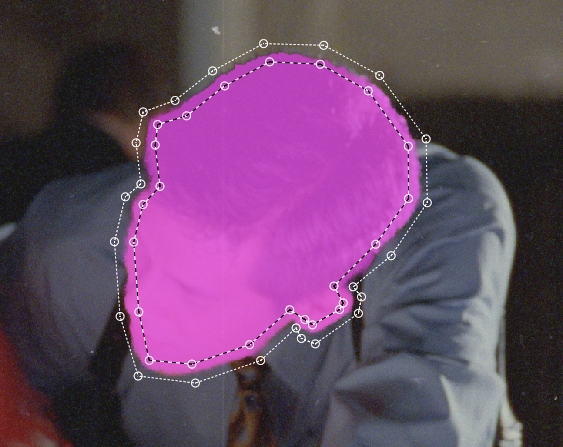
Vertices are drawn with a solid circle in frames where they have been keyed, and a dotted circle in frames where they have not. Key frames for the selected mask are also shown as mid-tone yellow indicators in the scrub bar.
Clicking the Edit Inner and Edit Outer buttons will allow the vertices on the inner and outer boundaries to be edited. Click and drag a vertex with the left mouse button to change its position. Edges can be adjusted as well as vertices by clicking and dragging with the left mouse button. Holding the Control key whilst clicking and dragging with the left mouse button will allow multiple vertices to be selected at the same time. When several vertices are selected, they can be adjusted together using the left mouse button. Click outside the mask whilst holding Control to de-select all vertices.
When multiple vertices are selected, they can be grouped together by clicking the Group button in the mask editor. Each group can be edited individually or attached to a different tracker, and can be assigned a different colour in the Cinema window if necessary.
To move the entire roto-spline at once, press and hold the J key in the Cinema to display the Mask TransformTool:
![]()
This keyboard shortcut can be changed in the preferences if desired.
To move the mask entirely, click and drag inside the transform tool with the left mouse button. Individual corners of the transform tool can also be adjusted, and masks can be rotated using the central rotate handle. The axis of rotation can also be adjusted. Releasing J will remove the transform tool from the Cinema.
Editing Colour Roto Masks
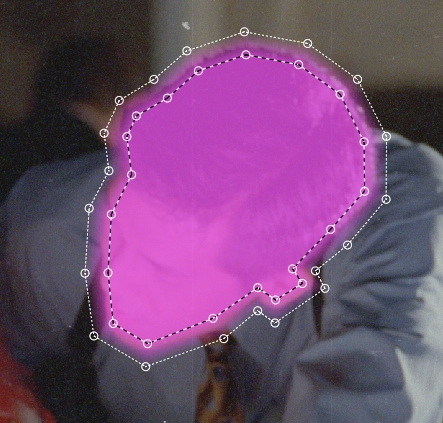
Colour-Roto masks will estimate a mask alpha value for each pixel between the inner and outer boundaries according to the colour of the image pixels. These can be used to obtain a high quality boundary around a specific object in the clip without the need to accurately position and animate the roto vertices in each frame:
Colour Roto masks can be edited using all the existing tools that are available to other spline-based masks. Pixels that are closer in colour to those inside the inner boundary will be set to "on", and those that are closer to the pixels outside the outer boundary will be set to "off". Mask values between fully on and fully off will be created for those pixels that are deemed to be a mixture of the inside/outside colours.
The contents of Colour Roto masks are stored to disk for increased performance, and will update after each edit to either the inner or outer mask boundary.
Editing Colour Selection Masks
The colour selection mask can be used to quickly select a coloured region of the clip for further processing (such as colour correction, noise adjustment etc..). The colour selection is specified by a centre point, along with colour and spatial falloff values, and the mask value at each pixel is determined by the similarity of that pixel colour to the colour at the centre point, given the falloff values. The centre point and falloff can be adjusted by clicking and dragging the control points with the left mouse button. A boundary line is shown, indicating the limit of the mask, but can be hidden by clicking the Show Boundaries button in the mask panel. Note that the opacity of the mask that is displayed in the Cinema window is affected by the overlay opacity value shown in the mask panel. Only when the overlay opacity is set to 100% will the the Cinema window reflect the actual mask alpha values.
Tracking Masks
Masks can be tracked throughout the clip using the controls described below. Note that the mask transformation obtained by tracking is independent of that produced by keyframing vertex positions. This means a mask can be tracked and then its vertices keyframed independently, without the need to adjust a vertex position in every frame. Note also that Colour Selection masks cannot be tracked.
<<, <, >, >>: These buttons will track selected masks forwards or backwards. Clicking >> or << will track backwards or forwards by multiple frames, and clicking < or > will track backwards or forwards by one frame.
The Edit Tracking ROI button can be used to adjust the region of interest (ROI) that defines which pixels in the image will be used for tracking. The ROI is displayed as a magenta rectangle in the Cinema window and can be adjusted by clicking and dragging with the left mouse button.
R-, Remove Tracking Key, R+: Clicking these buttons will remove the tracking transformation from all earlier frames (R-), from the current frame only (Remove Tracking Key), or from all later frames (R+).
Tracking Mode: These buttons allow the mask tracking mode to be changed. This defines the type of motion that will be tracked for each mask. Combinations of Translate, Rotate and Scale can be specified, along with Affine and Planar Perspective motion.
Use pixels %: This slider specifies the percentage of pixels used to estimate the tracking transformation. Decreasing this value will speed up the tracking process, but decreasing it by too much may mean important image information is lost, reducing tracking accuracy.
Outliers %: This slider can be used to enter the approximate number of outlier pixels (i.e. pixels that are not actually part of the layer) when using the Robust tracking tracking mode described below.
Compensate for illumination: When enabled, small changes in image brightness will be compensated for during tracking. Note that the compensation for brightness is assumed to be the same for all pixels inside the mask.
Use robust tracking: When enabled, it is assumed that some of the pixels contains inside the mask are not actually part of the object being tracked, and should therefore be ignored during tracking. This may be, for example, because part of the image is corrupted or hidden by additional image features. The approximate percentage of these 'bad' pixels is controlled using the Outliers % edit box described above.
Use incremental tracking: When enabled, the tracking template (i.e. the image that is being matched in each frame) will be updated at every frame. This means that when tracking over a large number of frames, the tracking template is able to adapt to small changes in the image content. However, it also means that the mask may drift out of position when compared to the starting frame. Note that this is equivalent to using the < or > buttons to repeatedly track the mask over multiple frames.