


Media Admin
The Media Admin provides a means of obtaining information on and administering the media in a project. This includes operations such as removing clips from a project; re-linking a clip if the source material it references has moved; specifying defect maps etc... These will typically be infrequent administrative tasks with the more day-to-day functionality, such as simply selecting clips to work on, being provided by the Workflow Manager and its nodes.
Displaying the Media Admin
You can access the Media Admin by pressing the  button, which is located at the top-right of Media Manager.
The Media Admin occupies the main part of the GUI with each clip listed as a row in the Media Admin window:

The information shown for each clip is mostly self-explanatory. Details on the exact meaning of the less obvious fields is given below:
Link status: a green chain and the label Linked indicate that the clip's source material can be accessed. If the source material is not available, the column will show a red chain alongside Disconnected. If the clip's source material cannot be accessed, typically because it has been moved, then the clip will need to be relinked before it can meaningfully be used. Furthermore, some of the information on the clip, such as file type and date, will be unknown and shown as a question mark.
Where the information is per-frame data, such as keycode, the value for the first frame in the clip is shown.
If there are numerous clips in a project then it can take some time for the Media Admin window to be populated with data. Under these circumstances the Status field of each clip is shown as a question mark, and the thumbnail as Missing icon, until that clip has been processed at which point the data becomes available. A percentage completion progress bar is displayed at the top of the Media Admin window as the data for the clips is being collated. The Media Admin is fully functional whilst this data collection phases is taking place and clips which have been processed can be operated on (e.g. removed from the project) using the controls described later. However, remember that it is not until the progress bar has completed and disappeared that the full information on all clips is available.
At the top of the Media Admin are controls to toggle between displaying timecode information or frame numbers, to change the size of the text in the Media Admin, and to search for specific clips in the project. On the right there is some summed information on the selected clips or all displayed clips if no clip is selected (by displayed clips we mean all clips that are in the list, even if they are not visible without scrolling; however, the list of displayed clips do not include clips that are excluded by the search functionality which is described later).
Selecting clips
Clips can be selected in the Media Admin by clicking on them with the left mouse button. A range of clips can be selected by pressing, dragging, and releasing the left mouse button. Holding down Control and Shift allow for multiple and blocks of clips to be selected with the left mouse button in the usual manner.
Adjusting clip properties
When a clip is imported into the application it is assigned a format standard selected by the user, or based on resolution and file header information.

Most clip properties, like frame rate and pixel aspect ratio, are covered by the clips standard. A standard is automatically assigned to each clip in PFClean based on available information in the clip's source files.
You can also specify the colour profile for clips in this panel. For further information, see the Colour Management page.
Standards manager
The properties of predefined standards can be examined by selecting the standard in the Standards Manager. New standard formats can be supported by creating them in the Standards Manager. Predefined format standards are listed in the System tab, whereas custom created standards are listed in the User tab.
Creating a new format standard
Clicking the New button will enable the Name, Width, Height, Frame rate, Pixel aspect, Interlaced, Video format and Cache type fields to define the new standard.
- Name: The name to reference the new standard in PFClean.
- Width: The width of the new standard's resolution.
- Height: The height of the new standard's resolution.
- Frame rate: The frame rate for the new standard.
- Pixel aspect: The pixel aspect ratio for the new standard, e.g. whether the standard is anamorphic.
- Interlaced: If selected, the new standard is considered fields-based.
- Video format: If selected, the new standard is considered a video format that can be processed in the Telerack node.
- Cache type: The cache location type to cache frames of the new standard.
Properties not defined by the clip's format standard can be changed with the pull down boxes available. Note: The properties that are available for selection depend on the clip's assigned format standard.
Colour Space specifies whether the image data in the clip is stored in a Linear or Logarithmic colour space. Most 10-bit DPX and Cineon footage is stored in logarithmic space, and adjusting this control will help PFClean perform better for those types of clips.
Colour Format Defines whether analysis in clip effects are calculated in RGB or YUV. This may affect the result obtained by analysis, but will not affect the format properties of the exported files.
De-interlace determines how fields are handled in the case of interlaced footage. The following options may be selected:
- None: No de-interlacing applied.
- Replicate Upper: Upper field repeated, lower field discarded.
- Replicate Lower: Lower field repeated, upper field discarded.
- Interpolate Upper: Progressive frame created based on motion interpolation of upper field.
- Interpolate Lower: Progressive frame created based on motion interpolation of lower field.
- Blend: Progressive frame created by blending both fields at 50% opacity.
- Temporal Blend: Progressive frame created based on motion interpolation between upper and lower field.
- Fields, Upper first: Clip length temporarily doubled for editing, with one frame for each field. lower field marked with * when displayed on Cinema timeline.
- Fields, Lower first: Clip length temporarily doubled for editing, with one frame for each field. upper field marked with * when displayed on Cinema timeline.
- 3:2 Pulldown: Progressive clip created by removal of interlaced frames inserted by the telecine process when capturing from film at 24FPS to video at 29.98fps. WSSWW, etc, indicates frame/field cadence - W = Whole, or progressive frame. S = Split, or interlaced frame
The two Fields, ... first settings allow PFClean's frame-based tools to be applied to each field independently, if necessary using information from an undamaged field to fix a damaged field.
Note: The de-interlace properties of a clip can alter its duration and must be set prior to using a clip in the Workflow Manager, if applicable.
Customising what is displayed
It is possible to customise what fields are displayed for the clips in the Media Admin, either because not all fields are relevant or in order to achieve a better fit on a limited resolution screen. clicking on the eye button on the top right of the Media Admin brings up a context menu from where each field can be enabled or disabled.
Size: The size of the source material on disk. If the source material size is shown as being approximate, that is starting with a ~, then this indicates that it is an estimated figure obtained by multiplying the disk size of the first frame in an image sequence by the number of frames. For image sequences where each frame has a constant disk size, e.g. DPX format, then this is valid and the number shown is accurate, but where this is not the case, e.g. JPEG format, the number shown is only an approximation (calculating the true disk size for these cases would involve accessing every frame in a sequence and this is too time consuming).
Sorting and searching
By default clips are sorted according to their name, as shown by the indicator in the Name field. Simply click on the header of any other field to sort using a different criteria. Sorting on the Size field sorts by the sum of the effect and stack renders sizes rather than the source material size. This is because you would typically sort on this field in order to find out which clips have large renders which can be deleted in order to reclaim disk space.
At the top left of the Media Admin window is a search text box. Typing into this text box filters what is displayed in the Media Admin to just those clips which have the specified text somewhere in any of the clip's data fields. The matching field(s) are highlighted in white:

The search is case insensitive. To revert back to showing all clips simply clear the search text box. Note that the indication of the total sizes at the top right of the Media Admin window are updated to reflect the clips that match the search filter.
The Negate checkbox reverses the effect of the search filter, i.e. it excludes items matching the search text.
Relinking media
If the source material of a clip can not be accessed it is represented in the Media Admin with a Media Missing icon and a Disconnected status:

Selecting such a clip enables the Relink button. Pressing that button brings up the file browser which you can use to navigate to the new location of the clip:
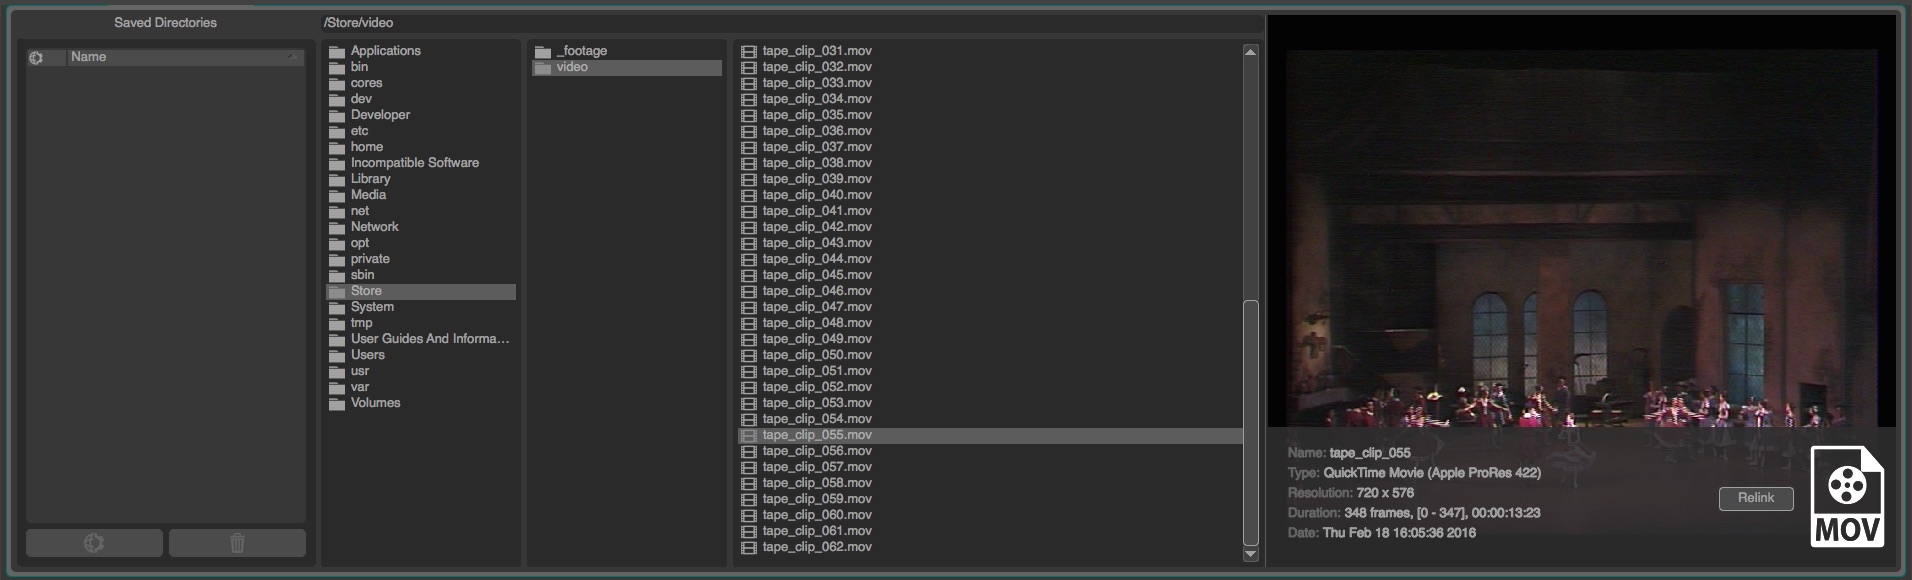
To relink a clip, navigate to the new location of the clip in the File Browser and click the Relink button in the File Browser's player window. The Relink button changed into a Cancel button to cancel the operation.
When a clip is relinked, the application will do its best to also resolve any other clips which also need relinking. For example, if
there are 3 clips originally located in /server1/path/to/clip1, /server1/path/to/clip2 and /server1/path/to/clip3; and /server1 moved
to /server2, then relinking any one of the clips will be sufficient to relink them all.
Deleting media
Clips can be deleted from the project using the Delete button Note that the Delete button has to be pressed twice in order to confirm the action.
A clip can not be deleted if it is in-use elsewhere within the application, for example, it is still loaded into the Cut detection or used by Batch processing. If a clip is in use, either the Cut detection button or the Batch manager button is active to open the location where the clip is still in use.
Multiple items can be selected by either dragging with the left mouse button held; Shift-left mouse button clicking to select a range of items; or Control left mouse button clicking to select multiple items.
Deleting a clip only deletes its representation within the application - the original material comprising the clip on disk is not deleted.