Grading
The Grading Panel allows shot-based colour correction within the Timeline, and comprises a variety of modes, ranging from basic to advanced.
To switch between the Timeline and the Grading panel, click on the Grading button beneath the TimeLine or Grading panel as shown below:

Layout
The Grading Panel is divided into 5 zones, and their functions are summarised below;

- Utilities: Change grading modes, display instrumentation, reset/bypass grades, navigate timeline
- Response Curves - Display grading offsets graphically, adjust pivot points
- Grading Controls - Virtual Wheel and trackball controls for tactile adjustment of grade
- ASC Utilities - Enable ASC CDL Grading mode, import and export ASC CDL setups
- Grading Palette - Visual gallery of grading setups
Utilities
 The top row of the Utilities menu allows switching between the 2 main grading modes; Video and Film. The
functionality of these two modes is described in further detail below.
The top row of the Utilities menu allows switching between the 2 main grading modes; Video and Film. The
functionality of these two modes is described in further detail below.
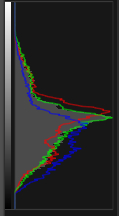
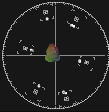
 The second row of the Utilities menu allows the Measurement Instruments
  to be displayed. These display the colour attributes of the currently displayed frame. The sampling resolution of the instruments can be set
by right-clicking on the tool button. This bring up a pop-up menu listing the available resolutions, from 1:1 to 16:1. The default sampling
resolution is 4:1.
to be displayed. These display the colour attributes of the currently displayed frame. The sampling resolution of the instruments can be set
by right-clicking on the tool button. This bring up a pop-up menu listing the available resolutions, from 1:1 to 16:1. The default sampling
resolution is 4:1.
 |
 |
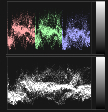 |
| Histogram | Vectorscope | Waveform |
To analyse only a certain portion of the image, toggle the
Area/Slice button  . A
right click on the button will pop up a menu allowing selection of
"Slice" or "Area" mode; when disabled, the full image is
processed.
. A
right click on the button will pop up a menu allowing selection of
"Slice" or "Area" mode; when disabled, the full image is
processed.
When "Area" mode (default) is selected, dragging with the right mouse in the Cinema window will draw a sampling rectangle. All pixels within this rectangle are processed (according to the sampling resolution) instead of the full image. The rectangle can be adjusted by dragging the corners with the right mouse button.
When "Slice" mode is selected, dragging with the right mouse will draw the sampling slice line. When using slice mode, all pixels along the line will be processed to generate the histogram data. As with the area rectangle, the slice line can be adjusted by dragging the end points of the line using the right-mouse button in the Cinema window.
The second row of the Utilities menu also allows a Gamut Warning  to be displayed. The Gamut Warning will highlight in blue the colours which cannot be reproduced accurately on film.
 The third row of the Utilities menu allows the user to Reset
  the current
shot's grade to a default value, or Bypass
the current
shot's grade to a default value, or Bypass  , temporarily disabling the
grade for comparison with the original image. Reset and Bypass buttons also appear elsewhere in the grading menus.
, temporarily disabling the
grade for comparison with the original image. Reset and Bypass buttons also appear elsewhere in the grading menus.
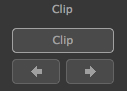 The Clip Controls at the bottom of the Utilities menu area allows the choice between timeline mode and clip mode. When the
Clip button is selected, the interface will operate in clip mode, where only the current clip is displayed in the Cinema,
and playback will display only that clip. The previous/next clip buttons will also be enabled in this mode. When the Clip
button is deselected the entire timeline is available to the Cinema, grading changes can be viewed in their context and the user can
scrub through all shots in the Timeline.
The Clip Controls at the bottom of the Utilities menu area allows the choice between timeline mode and clip mode. When the
Clip button is selected, the interface will operate in clip mode, where only the current clip is displayed in the Cinema,
and playback will display only that clip. The previous/next clip buttons will also be enabled in this mode. When the Clip
button is deselected the entire timeline is available to the Cinema, grading changes can be viewed in their context and the user can
scrub through all shots in the Timeline.
Response Curves and Pivots
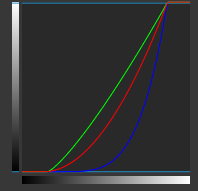 The Response Curves graphically display the offsets applied to RGB channels as a result of adjustments made in the Grading Panel,
and cannot be edited.
The Response Curves graphically display the offsets applied to RGB channels as a result of adjustments made in the Grading Panel,
and cannot be edited.
 The Pivots allow the user to define the range and limits of specific Grading controls. These will be described in further detail below.
Grading Controls
The Grading Controls become active as the cursor passes over them, as in the case of the Gamma and Saturation controls shown below:
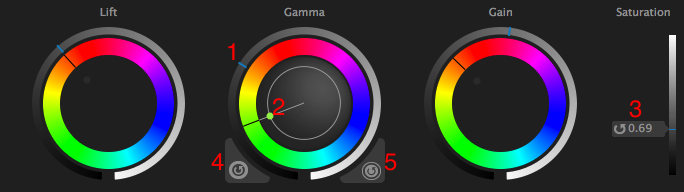
- Wheel Control - Drag the light blue wheel target clockwise to increase overall brightness, drag anticlockwise to decrease
- Trackball Control - Drag the small target circle towards desired colour. The colour of the target circle updates to display the current tint value.Rotate the grey radial line clockwise or anticlockwise to change hue value. Drag the grey outline circle towards the edge to increase tint intensity, towards centre to decrease.
- Slider Control (with reset button on the left)
- Reset Wheel
- Reset Trackball
ASC Utilities
 Selecting ASC Compliant allows grading in the industry-standard ASC-CDL colour values, and import / export of .CCC files, enabling
look exchange with third-party solutions.
Selecting ASC Compliant allows grading in the industry-standard ASC-CDL colour values, and import / export of .CCC files, enabling
look exchange with third-party solutions.
The ASC CDL (American Society of Cinematographers' Colour Decision List) parameters are described below:
Slope Equivalent to Video 'Gain' affects image Highlights Offset Equivalent to Film 'Density' affects image Overall Power Equivalent to Video 'Gamma' affects image Midtones
 Looks can be imported to the Grading Palette (Described below) by pressing Import and using the browser to select a .CCC file
Looks can be exported from the Grading Palette by selecting a look from the Palette, pressing Export and using the browser to
select a folder in which to store a .CCC file
Looks can be imported to the Grading Palette (Described below) by pressing Import and using the browser to select a .CCC file
Looks can be exported from the Grading Palette by selecting a look from the Palette, pressing Export and using the browser to
select a folder in which to store a .CCC file
 PFClean will apply an ASC Compliant grade to an event in a sequence when an EDL containing a CDL comment is imported and conformed. Press
the Revert to EDL button to restore the grade applied when the sequence was originally conformed.
PFClean will apply an ASC Compliant grade to an event in a sequence when an EDL containing a CDL comment is imported and conformed. Press
the Revert to EDL button to restore the grade applied when the sequence was originally conformed.
Grading Palette
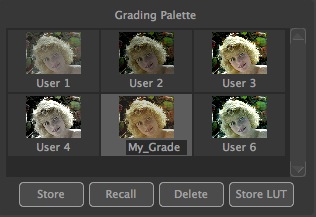
When a specific look is created, it may be required for use on multiple clips in the TimeLine, and they can be stored and managed via the Grading Palette area. Small thumbnails show a representation of the look when it was created. To create a new look in the Grading Palette, simply click the Store button. This will take the grading parameters from the current clip and store them in the palette, along with a small thumbnail image using the current clip. To re-use that look on another clip, or to use that look as the basis of grading, simply click the Recall button. The grade parameters will be copied into the current clip, where further editing can take place. Note: editing a recalled grade will only change the local version of the grade on the clip; it will not change the stored grade. When scrubbing through a clip, if a stored grade is being used on a clip, then the relevant icon in the grading palette will be highlighted to indicate that it's being used. If a particular look is no longer required in the grading panel, it can be deleted with the Delete button. To rename a look from its default name, simply double-click on the icon in the grading palette and type a new name. Depending on whether Video or Film grading mode is selected, a Grading Palette containing Video or Film looks will be displayed.
Video Grading
Video emulates a Telecine-style colour corrector, with Lift, Gamma and Gain controls for the Shadows, Midtones and Highlights
The Wheels control the overall level, and the Trackballs control the colour balance
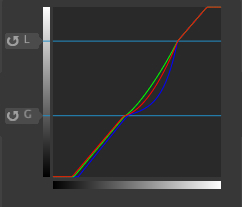
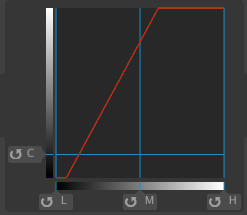
The Pivots, which can be adjusted in the Response Curve panel, control the range and limits of the Lift and Gain values.
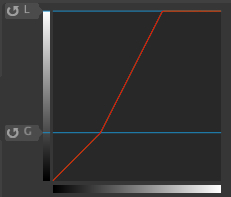 Here, the Gain Pivot, labelled 'G', has been raised above its default location at the bottom of the Response Curve. The Gain adjustment (increased) rotates
around it, and has no effect below it.
Here, the Gain Pivot, labelled 'G', has been raised above its default location at the bottom of the Response Curve. The Gain adjustment (increased) rotates
around it, and has no effect below it.
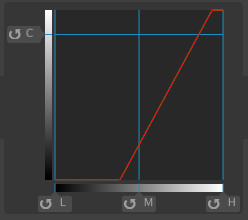
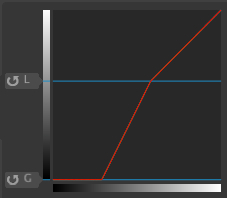 Here, the Lift Pivot, labelled 'L', has been raised below its default location at the top of the Response Curve. The Lift adjustment (decreased) rotates around
it, and has no effect above it.
Here, the Lift Pivot, labelled 'L', has been raised below its default location at the top of the Response Curve. The Lift adjustment (decreased) rotates around
it, and has no effect above it.
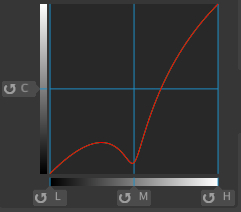
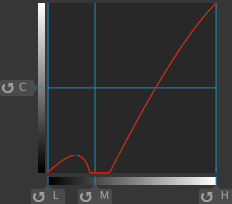
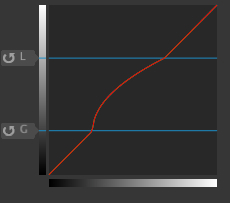 When the Lift and Gain pivots are offset, they define the upper and lower limits of the Gamma adjustment (increased) as shown here.
When Video Grading is changed to ASC Compatible mode, the Pivots are disabled, as these are not compatible with the ASC CDL specification.
Film Grading
Film Grading offers a combination of 4 grading modes:
A Wheel / Trackball mode, which emulates a typical tactile control surface, and allows adjustments to Luminance (Density), Balance, Contrast and Saturation (Master, Low, Mid and High) B Curve mode, which allows precise graphical adjustment of RGB and luminance levels (Master, Low, Mid and High) C Histogram mode, with simple threshold and level controls. (Master only) D Printer Light mode, which emulates a traditional optical film printer (Master only)

Master and Luma Ranges
When Master (1) is selected, grading adjustments affect all luminance levels equally. This is possible for all grading modes.
Density level and balance can be adjusted with the wheel and trackball. Slider 4 controls Contrast, and slider 5 controls Contrast Pivot (8). The Contrast Pivot is the point around which the Contrast rotates
 |
 |
 |
| Contrast Pivot Default | Contrast Pivot low | Contrast Pivot high |
Slider 6 controls Saturation
When a Luma Range (Low, Mid, or High) (2) is selected, grading adjustments affects only the luminance values within the selected range. This is possible for Wheel / Trackball and Curve modes Coarse adjustments to the luma ranges can be made by moving the Luma Range Pivots (9)
In this example, the Mids have been darkened by rotating the wheel anticlockwise:
 |
 |
 |
| Mid Pivot Default | Mid Pivot low | Mid Pivot high |
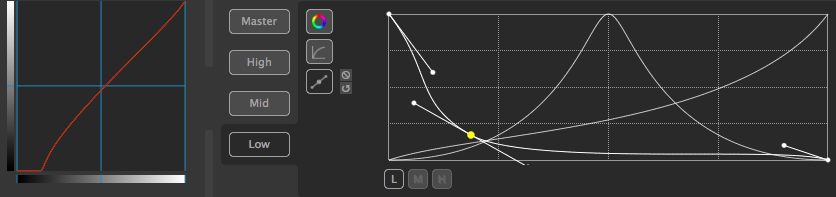
Fine adjustments to the luma ranges can be made by modifying the Luma Ranges (10)
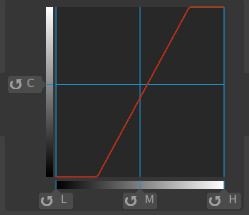
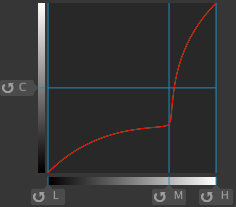
The Luma Ranges menu (10) displays editable curves used to define the range over which the Low, Mid and High tonal values operate. Values will overlap but can be adjusted to increase or decrease the tonal range represented by any of the 3 range buttons. The curves can be adjusted by clicking and dragging the curve handles with the left mouse button. New vertices can be introduced by clicking with the left mouse button on the curve. Points can be removed by clicking on them with the left mouse button
In this example, the Lows have been darkened by rotating the wheel anticlockwise: Compare the results shown in the Response Curves when the Luma Range curves are modified
Here, the Low range is narrower, so only the darkest tones are affected:
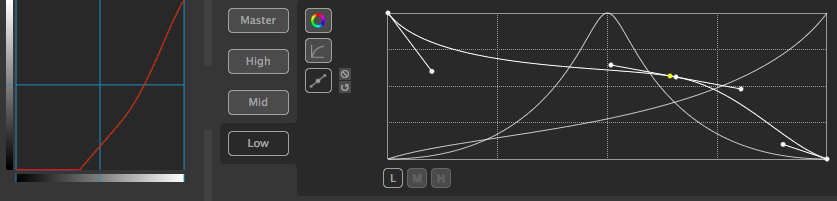
Here, the Low range is wider, so a greater range of tones, including midtones, are affected:
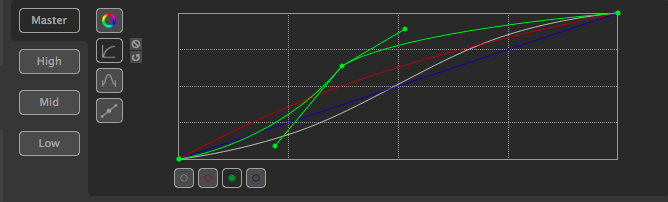
Curve Grading
Curve Grading mode ( B ) will display a curve editor where the red, green, blue and luminance curves can be adjusted individually by clicking and dragging the curve handles. New vertices can be introduced by clicking with the left mouse button on the curve. Points can be removed by clicking on them with the left mouse button. CTRL_Clicking (or CMD_Clicking on OSX) will 'break' curve tangents, allowing differing input and output tension, as shown on the green channel below.
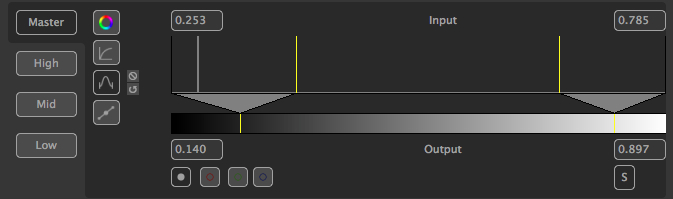
Histogram grading
Histogram mode ( C ) opens the histogram panel. By default the complete colour range is shown but this can be adjusted using the yellow lines at the edges of the main graph window. Moving the lines will remap the black and white points to a narrower range. The Sample button is used to marquee an area of the frame to display the values within the sampled area.
Printer Lights
Printer Light mode ( D ) emulates a traditional optical printer, allowing fixed increments to R,G,B and Luminance be entered via the GUI or numeric section of the computer keyboard
This mode can be used to recreate colour timing settings where these have been recorded in lab reports.

The Incremental Cineon code value of the printer light step (default = 12) and neutral base value (25, 25, 25) can be set in the Preferences / Grading section

1 Versions 2-4 of the Apple Interchange File Format appear to be compatible with Version 1, at least to the extent required by PFClean. See "Import Edit" section of the "Preferences" chapter of this manual for more details.