


Retime
The Retime node can used to retime clip and camera/geometry/tracking data to increase or decrease the frame-rate of the camera and apply other effects such as non-linear slowdown and speedup.
The Retime node operates on the input clip (called the Source clip) and retime it to generate an output clip (called the Target clip). During the retime process, new image data can be rendered using optical flow technology to produce smooth transitions between frames. All tracking data such as camera and object motion, geometry tracks, and 2D tracker paths will also be interpolated to match the retimed footage.
Optical flow data for retiming is calculated on-the-fly using the GPU where necessary, but can also be generated up-stream using the Optical Flow node if required. As well as providing tools to edit the optical flow fields, the Optical Flow node will also store the data to disk, speeding up the rendering process when retiming.
The Cinema window and Viewer windows always display image and tracking data associated with the retimed target clip.
Source Clip Controls
The In and Out edit boxes can be used to specify the first and last frames of the source clip for the retime.
Clicking the Fit button will scale the keyframe graph horizontally to fit the range between the source clip in and out points. Clicking the Reset button will reset the in and out points to their default values.
Target Clip Controls
The Time Scale edit box can be used to specify an overall scale factor for the time range of the target clip, relative to the time range of the source clip. For example, entering a time scale value of 2.0 will mean the target clip plays for twice as long as the source clip.
The Frame Count edit box is used to adjust the overall number of frames in the target clip.
The Duration edit box can be used to change the time the target clip plays for, measured in seconds.
The Frame Rate edit box can be used to adjust the frame-rate of the target clip.
Clicking the Fit button will scale the keyframe graph horizontally to fit the range between the target clip in and out points.
Clicking the Reset button will remove all target clip keyframes and restore the keyframe graph to its default state.
Keyframe Graph
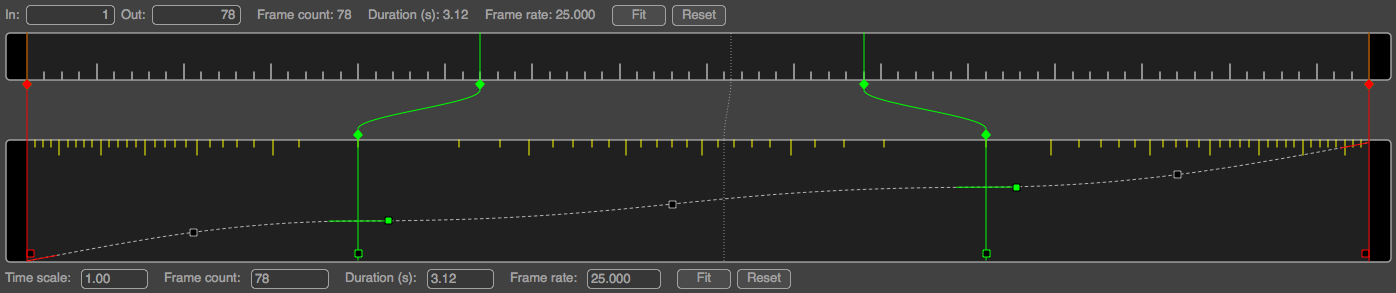
The keyframe graph is split into two sections: The top graph represents the Source Clip, and shows the location of the source clip in and out points (in red), along with the location of all source keyframes (in green) and the frame that corresponds to the current target frame displayed in the Cinema window (as a vertical white dotted line). Clicking with the left mouse button anywhere in the source keyframe graph will move directly to that frame.
The bottom graph represents the Target Clip, and show the in/out frames (in red), the position of the target keyframes (in green) and the current target frame displayed in the Cinema window (as a vertical white dotted line).
The dotted line in the target keyframe graph represents the progression of the source clip throughout the target clip. Initially, this is a straight line starting from the bottom of the graph (corresponding to the source clip in-point) to the top (corresponding to the source clip out-point). This means the first frame of the target clip corresponds to the first frame of the input clip, and similarly for the last frame. The straightness of the line indicates a linear progression of frame numbers from start to end. As the clip is retimed, this graph will change to illustrate where the target clip is slowing down or speeding up relative to the source clip.
The speed of the target clip is also represented by the yellow frame tics at the top of the target keyframe graph. Each of these tics corresponds to a white tic in the source keyframe graph, and as the target clip is slowed down or sped up, the density of these frame tics will change appropriately to illustrate the speed of the target clip relative to the source.
Keyframes can be added anywhere between the in/out points using the Keyframe controls (see below). Each keyframe has a position in the source clip, and a corresponding position in the target clip. During retiming, the target frame numbers will be calculated to ensure that each source keyframe maps exactly to the corresponding target keyframe. By positioning the source and target keyframe, the overall speed of the target clip can be adjusted to achieve the desired artistic effect.
Once a keyframe is added, its position in either the source or target graphs can be adjusted by clicking and dragging the keyframe handle with the left mouse button. As the keyframe changes position, the density of the yellow tic marks and the dotted line representing the progression of the source clip will change accordingly.
By default, each keyframe is set to automatically calculate its in-slope and out-slope to ensure a smooth frame transition. Clicking the square button at the bottom of the keyframe will cycle the keyframe behaviour. Clicking once will allow the angle if the in-slope and out-slope handle to be adjusted manually for the keyframe, which can be used to increase or decrease the target frame speed. Clicking the handle again will allow the in-slope and out-slope angles to be adjusted independently.
As well as control over individual keyframes, the speed of the target clip between two keyframes can be set to a constant value if required by clicking the squared button on the dotted graph line. When set to constant, the out-slope and in-slope of adjacent keyframes will change automatically to ensure the graph is a straight line. Clicking the button again will revert the keyframes to their previous state.
Keyframe Controls
Keyframes can be navigated by clicking the < and > buttons which jump to the previous and next keyframes respectively. Clicking the Add button will generate a new keyframe at the current frame.
When a keyframe is present at the current frame, clicking the Delete button will remove the keyframe. The source and target frame numbers for the current keyframe are also displayed in the Source and Target edit boxes.
Render Controls
The Render Mode used to generate the in-between frames can be set to Nearest Frame, Blend Frames or Optical Flow. Optical Flow mode will provide the best quality frame interpolation, but requires calculating optical flow for each frame which can increase rendering time.
When in Optical Flow mode, two additional controls are available for rendering motion blur. Shutter Angle controls the overall exposure time for the frame (measured in angular degrees, between 0 and 360), and Samples controls the number of samples used to render each frame when applying motion blur. Increasing the Shutter Angle to a value above zero will render motion blur where applicable by analysing how quickly the camera is moving between frames.
The Edit ROI button can be used to limit the area of the image that is retimed. Pixels outside this area will be rendered in black.
Display Controls
Clicking the Dual View button will split the Cinema display into two parts, showing the target clip on the left and the source clip on the right, each displaying a frame at the same timestamp.
When Dual View mode is enabled, clicking Source will toggle display of the source camera, geometry and tracking data in the Viewer windows alongside the retimed target data.
Clicking the Ground and Horizon buttons will toggle display of the ground plane in and horizon line in the Cinema and Viewer windows.
The Trackers, Cameras and Geometry buttons can be used to toggle display of 2D tracker, camera and geometry objects in the Cinema and Viewer windows.
Clicking Bounds and Paths buttons will toggle display of object group bounds and motion paths in the Cinema and Viewer windows.
Default Keyboard Shortcuts
Keyboard shortcuts can be customised in the Preferences.
| Add Key | Shift+A |
| Delete Key | Shift+D |
| Fit Source | Shift+S |
| Fit Target | Shift+T |
| Dual View | Shift+Q |
| Edit ROI | Shift+R |
| Display Source | Control+S |
| Display Ground | Control+G |
| Display Horizon | Control+H |
| Display Trackers | Control+T |
| Display Cameras | Control+C |
| Display Geometry | Control+M |
| Display Bounds | Control+B |
| Display Paths | Control+P |