Central Console
The Central Console can be used to add, edit and remove projects from the project list.
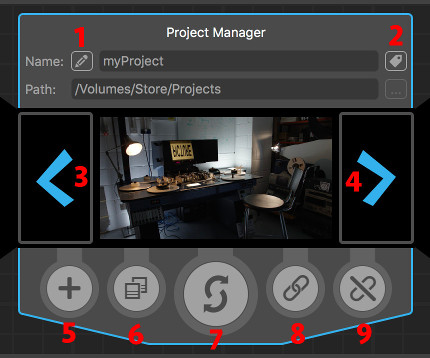
The buttons in the central console are:
(1) Rename: Rename a project.
(2) Tags: Edit the tags associated with a project.
(3) Navigate Left: Move the project on the left into the central console.
(4) Navigate Right: Move the project on the right into the central console.
(5) Create Project: Create a new project.
(6) Save As: Save the open project with a different name and path.
(7) Switch Project: Close the current project (if any) and open this project
(8) Relink Project: Browse to locate a project on disk, and add it to the project list.
(9) Unlink Project: Remove the project from the project list.
Editing project attributes
The name of the project and the path where it is saved on disk are displayed at the top of the console. The open project can be renamed by clicking the Rename button (1). This will all the project name to be edited. Clicking the Rename button again will change both the project name and the name of the folder in which the project files are saved. To abort renaming the project, press the Esc key.
Each project can have a set of tags attached to it, and these tags can be used to quickly search for projects in the Project List. To edit the tags of the open project, click the Tags button (2). This will display the tags popup next to the button:
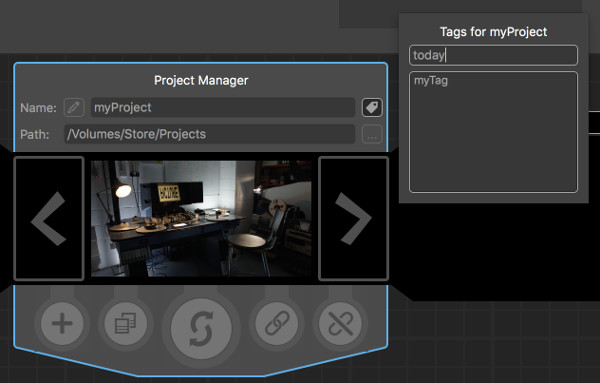
Tags can be added or deleted from the project using the edit box at the top of the popup. To enter multiple tags at the same time, separate them with a comma , and press the Enter key to complete the edits. Tags that are already present in other projects are displayed in the list underneath. To add a tag from another project, just click on the tag name and it will be added to the tag list.
Changing projects
When more than one project is available, the navigation buttons (3) and (4) can be used to change which project is displayed in the central console.
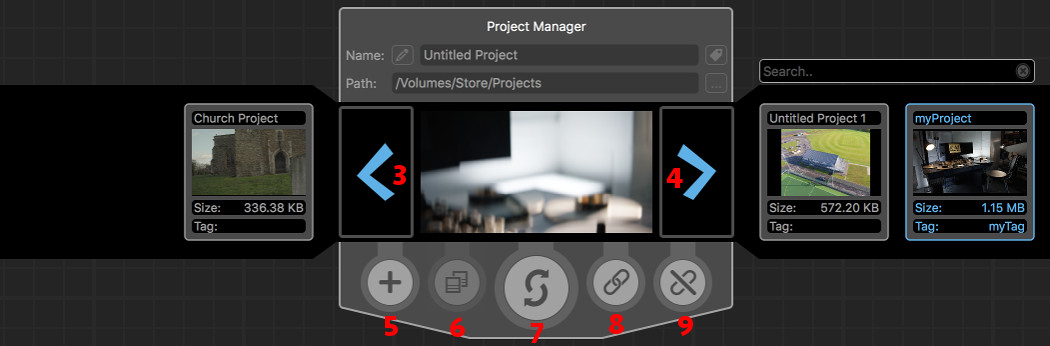
The project that is currently open in PFTrack is displayed with a blue border. To open another project, click the Switch button (7). This will open the project displayed in the central console and automatically switch to the Workspace view.
Creating new projects
The Create Project button (5) allows new projects to be created. Clicking this button will allow a project name and path to be entered into the edit boxes above. Clicking the Confirm button ✔ will generate the project files and switch automatically to the Workspace view for the new project.
To abort creating a project at any time, press the Esc key.
Saving projects
PFTrack will automatically save the open project when required to ensure any modifications are stored on disk. You can also save a copy of the project using a different name or path by clicking the Save As button (6). This will allow the name and path to be changed. Clicking the Confirm button ✔ will save the project files at the new location, and automatically switch to the Workspace view with the newly saved project open.
Removing projects
Projects can be removed from the list by clicking the Unlink Project button (9). Clicking the Confirm button ✔ will remove the project from the list.
Please note: Unlinking a project will NOT delete any of the project files. If you would like to delete your project files then you should do so using your operating systems file browser.
Adding projects
If you have removed a project from the list using the Unlink Project button, or if a project from another location needs to be added to the list, this can be done by clicking the Relink Project button (8). This will open a file browser, allowing you to browse to select a PFTrack Project file (with a .pftp extension). This project will the be added to the project list.