


Projects
Project list
The projects list shows all currently available projects. Projects are represented by a thumbnail and information about the project such as the amount of disk space it occupies. The project list can be sorted alphabetically or according to the project's date, or filtered for specific project tags.
Selecting projects
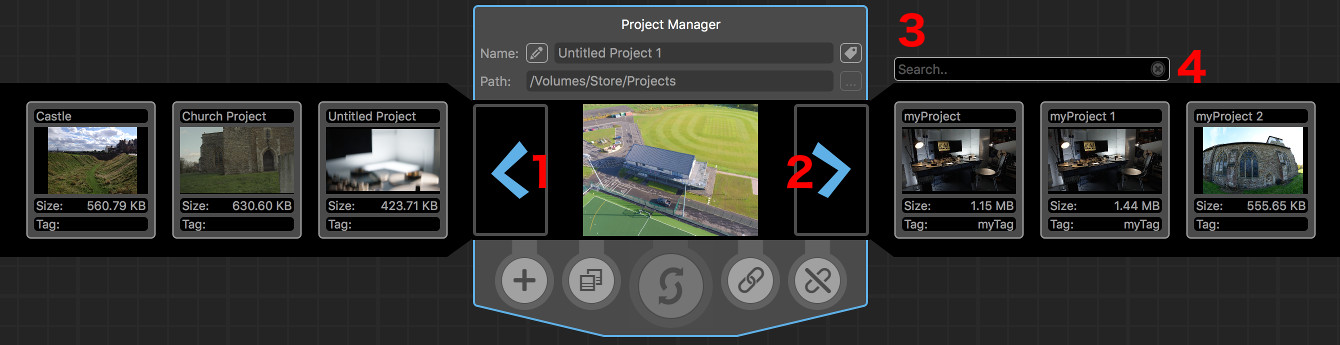
The project displayed in the central console (1) is the currently selected project. Projects can be selected by clicking on their thumbnails in the list. Upon selection, the project list will shift to display the selected project in the middle. Projects can also be selected by navigating the project list with the <(2) and >(3) buttons in the central console.
Additional options will be available once the project has been switched to or opened.
Switching projects
To switch to the selected project, click the S button (4) in the central console. Once switched, the project can be opened by switch to the PFTrack Workspace by clicking the Project Manager/Workspace button (5), or any existing snapshot can be opened to restore a previous state of the project (see below for further information about snapshots and archives).
Creating new projects
The Create a new project button (6) allows new projects to be created. Clicking the + button will enable the central console and allow a name for the new project to be entered, a project path selected and add tags to be added if required. The switch button (4) will turn into a ✔ button which can be clicked to create the project folder. The Create button will turn into a ✖ button which can be clicked to abort project creation.
Note: A valid project path needs to exist before a project can be created. Until one is available, the Create a new project will be disabled.
Relinking projects
It is possible for projects to exists on the workstation without currently being linked to PFTrack. Projects that are stored on an accessible path, but not listed in the Project list, can be added to the list by clicking the Relink an old project button (7) and locating the project file (ending in .pfrp). Once linked, the project will appear in the projects list.
The selected project can be unlinked, that is removed from the list, by clicking the Unlink the selected project button (8). An unlinked project still exists on the disk, but will no longer appear in the Project Manager's projects list unless it is relinked again.
Additional console controls
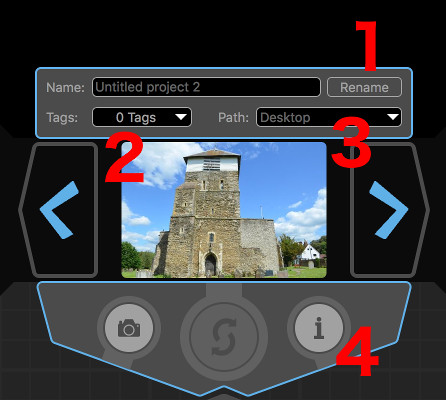
(1) Rename: Rename the selected project. Enables the Name field to specify a new name for the project. This is only available for the currently active project.
(2) Tags: User defined keywords to describe the project. The project list can be filter for specific tags.
(3) Path: The name of the project path where this project is stored.
(4) Show information on the currently selected list: Display additional information about the project, such as the number of clips and Media Bins in the project.
Managing projects
The ordering of projects in the project list can be adjusted as follows:

(1) Sort by: Method of sorting the project list. Options are
A-Z: Sort the list alphabetically
date: Sort the list by the date projects have been modified last. The most recently modified project will be on the right of the list.
(2) Tags: Filters the list to show only project with the selected tag(s) assigned.
(3) Projects can be deleted entirely from disk by clicking the delete button
Project states
Projects can be in different states, which are represented differently in the project list.
 |
 |
 |
 |
 |
| The active project | An accessible project that is not active | An archived project | A project that hasn't been closed properly. This could indicate an issue with the project files. | A project that cannot be accessed, for example because the disk where it is stored is not mounted. |
Project Manager Info
The Project Manager Info section lists statistics on the linked projects.
- Number of Project Files: The number of projects linked and displayed in the project list.
- Total Project Space Used: The disk space used by all linked projects.
Snapshots
The current state of an open project can be stored as a snapshot.

(1) Create a snapshot of the currently active project: Create a snapshot of the project. Snapshots will store the project in its current state and can be opened to restore the saved state.
(2) Select previous item in snapshot list, (3) Select next item in snapshot list: Select the next or previous snapshot.
(4) Open the currently selected snapshot: Open the selected snapshot. Please note, opening a snapshot will overwrite the current state of the project. If you want to preserve the current state, create a new snapshot before opening another one.
(5) Delete the currently selected snapshot: Delete the selected snapshot. This will remove the data files from disk. Note: this operation cannot be undone.
Archives
Archiving provides a way of storing all project data (including snapshots) to disk for cold storage, once a project is complete.

1) Create an archive of the project: Archive the current project.
2) Archive source footage: Include source footage in the project archive. If this option is not selected, source footage must be archived through different means outside PFTrack. A blue checkmark ✔ indicates whether this option is selected.
3) Archive cached footage: Include cached footage in the project archive. A blue checkmark ✔ indicates whether this option is selected.