


Compound Node
A Compound Node is a way of creating a new customised node which uses a Python script to encapsulate the functionality of existing nodes and presents their controls within a new customised node interface. This feature can be used, for example, to combine the functionality of the existing Auto Match and Camera Solver nodes into a new single Match & Solve node or to simplify a node's controls for novice users.
An example compound node script, simpleSolve.py is provided which implements the example described above.
User-written compound node scripts can be placed in the user's /Users/USERNAME/Documents/The Pixel Farm/PFTrack/nodes directory, or in the /Applications/The Pixel Farm/PFTrack/nodes.
These directories are scanned on application startup. For each compound node loaded, a new item in the Python group in the Node Panel is created.
Defining basic functionality
A script starts with the following line to import the compound node functionality:
import pfpy
There must then be a pfNodeName function present which defines the name of the compound node as it appears in the application:
def pfNodeName():
    return 'Simple solve'
There must also be a pfCreateNode function to define the contents of the compound node. The single parameter to this function is a Python object of class PyCompoundNode.
When defining the basic operation of the compound node the following 2 methods of PyCompoundNode are used:
addNode(string name, string type)
connectNodes(string from, string to)
These two functions construct an internal network of nodes within the compound node. For example:
def pfCreateNode(cnode):
    cnode.addNode('match',  'Auto Match')      #  Add an Auto Match node called 'match'
    cnode.addNode('solve', 'Camera Solver')    #  Add a Camera Solver node called 'solve'
    cnode.connectNodes('input', 'match')       #  The input of the compound node is wired to the input of the match node
    cnode.connectNodes('match', 'solve')       #  The output of the match node is connected to the input of the solve node
    cnode.connectNodes('solve', 'output')      #  The output of the solve node forms the output of the compound node
Note that input and output are reserved names and represent the single input and single output of the compound node.
After the compound node is created you can initialise it by defining the function "pfInitNode". The single parameter to this function is a Python object of class PyCompoundNode representing the compound node.
In the pfInitNode function the PyCompoundNode method getNode can be used. This method returns the specified named node as a Python object of the relevant node class. This returned object can be used to call methods specific to that node type as described here. For example:
def pfInitNode(cnode):
    cnode.getNode('match').setFailureThreshold(0.5)   # Set failure threshold of Auto Match node
Note that the creation and initialisation of a compound node are two distinct operations.
Defining a GUI
The compound node script can optionally define a simple interface/editor to present in the application. Note that support for creating a compound node GUI is limited to small handful of GUI widget types, e.g. buttons, sliders etc.
A GUI is defined by pfCreateGUI, pfUpdateGUI and pfGUIActivated functions. The first function defines the contents of the GUI; the second function updates the status of the GUI whenever a change occurs; the third function defines the actions to be taken when the various GUI widgets are activated.
The pfCreateGUI function takes 2 parameters, the first is a Python object of class PyCompoundNode representing the compound node; the second a Python object of class PyCompoundNodeEditor. When defining the contents of the GUI the following 7 PyCompoundNodeEditor functions can be used:
addButton(string name, string text)
addInput(string name)
addLabel(string name, string text)
addSlider(string name, float min, float max)
addCheckbox(string name, int checked)
addCombo(string name)
newRow()
Respectively these add a push button, a text input box, a text label, a slider, a checkbox, a pull-down combo box, and create a new row for laying out GUI widgets (widgets are laid out horizontally from left to right). For example:
def pfCreateGUI(cnode, gui):
    gui.addButton('matchButton', 'Match')      #  Add a button labelled 'Match' called 'matchButton'
    gui.addButton('solveButton', 'Solve')      #  Add a button labelled 'Solve' called 'solveButton'
    gui.addButton('bothButton', 'Match+Solve') #  Add a button labelled 'Match+Solve' called 'bothButton'
The state of the GUI is updated as required by defining the function:
def pfUpdateGUI(cnode, gui):
    gui.setEnabled('matchButton', 0) # Disable the 'Match' button
The following PyCompoundNodeEditor methods are available to set the state of various widgets:
setButtonText(string name, string text)
setLabelText(string name, string text)
setSliderValue(string name, float value)
setInputText(string name, string text)
setCheckboxChecked(string name, int checked)
setComboEntry(string name, string entry)
setComboCurrentEntry(string name, string entry)
clearCombo(string name)
setWidth(string name, int width)
setEnabled(string name, int enabled)
setHidden(string name, int hidden)
The allied function, pfGUIActivated, is called when widgets are activated and specifies the action to be taken. For example:
def pfGUIActivated(cnode, gui, widget, value):
    if widget == 'matchButton':                #  When the 'Match' button is pressed, call the autoMatch() method of the match node
        match= cnode.getNode('match')
        match.autoMatch()
    elif widget == 'solveButton':              #  When the 'Solve' button is pressed, call the solveAll() method of the solve node
        solve= cnode.getNode('solve')
        solve.solveAll()
    elif widget == 'bothButton':               #  When the 'Match+Solve' button is pressed, call both methods above
        match= cnode.getNode('match')
        match.autoMatch()
        solve= cnode.getNode('solve')
        solve.solveAll()
The first parameter is a PyCompoundNode object representing the compound node; the second is a PyCompoundNodeEditor object representing the GUI; the third is a string containing the name of the activated widget; and the fourth parameter is a string specifying the new value for the activated widget.
In the pfGUIActivated function the following extra PyCompoundNodeEditor methods are available:
fileBrowser(string text, string initialDirectory, string filter, string loadOrSave)
messageBox(string title, string text, string button1Text, [string button2Text], [string button3Text])
writeToLog(string text)
These functions brings up a file browser, brings up a message box and writes an entry to the application log. The fileBrowser functions returns the name of the chosen file as a string, similarly the messageBox function returns a string corresponding to the button pressed.
Expanding a compound node
Compound nodes are represented slightly differently to other nodes in the tracking tree - they are shaded red:
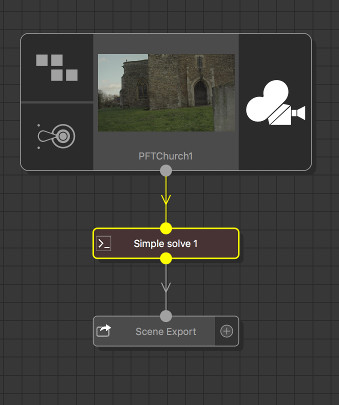
This indicates that the compound node can be expanded into its constituent parts:
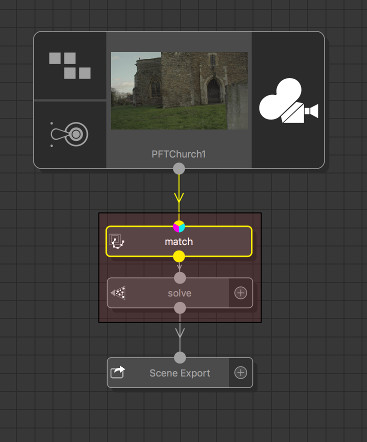
In its expanded state a red bounding box is drawn around the individual nodes that make up the compound node. These can be used just like any other node. Expanding a compound node is useful in a number of situations:
to visualise exactly what that compound node is doing internally
to access an internal node to (for example) apply a mask or access its node editor
to connect an external node to a connector within the compound node's internal network
If you make a change to the compound node's internal network, e.g. rewire or delete a constituent part, then a warning will be given that this action will break the compound node. If you continue with the action the compound node itself will cease to exist and its constituent parts will now be independent nodes.
Another way of accessing the internal components of a compound node is through the node editor. The node editor for a compound node defaults to showing the GUI that compound node defines for itself. However, in the lower-right hand corner of the editor there is a More button. Pressing this toggles the editor between showing the defined GUI and the editors for each of the compound nodes constituent parts. When the editor is expanded the More button now turns into a Less button which when pressed reverts the editor to showing the GUI defined by the compound node.
The author of a compound node can control its ability to be expanded like this, and its representation in the tracking tree, by calling the PyCompoundNode method setExpandAllowed in the pfCreateNode function. The function takes an integer which is the combination of:
1 - can be expanded using the More/Less button.
2 - is shown in red in the tracking tree
4 - can be expanded by shift-clicking
Controls
Double-click with the left mouse button on node in the Workpage with Shift held to collapse/expand the node.