


Texture Extraction
The Texture Extraction node can be used to extract texture maps from images and map them onto geometric objects. Geometry may be generated by any other node, such as Photo Mesh, Image Modelling, Geometry Track or Test Object.
Texture UV maps can be created and edited for any object, and both static and animated textures can be mapped onto the object for export. Texture maps can be extracted automatically or manually painted directly onto the geometric mesh.
Usage
The texture extraction node performs two main operations: generating UV maps for objects, and extracting textures from the input images to map onto those objects.
Generating UV maps
Any object that is passed into the Texture Extraction node already having a set of UV texture coordinates can be automatically assigned a Custom UV map type, which will use the UV coordinates defined by the object.
Alternatively, UV maps can be generated in the Texture Extraction node. The UV Projection menu is then used to specify the type of projection map:
Custom: Use the texture coordinates already stored with the object;
Planar: Define texture coordinates by projecting the object onto a flat plane;
Cuboid: Define texture coordinates by projecting the object onto the faces of a cuboid;
Cylinder: Define texture coordinates by projecting the object into a cylinder;
Sphere: Define texture coordinates by projecting the object onto a sphere;
Camera: Define texture coordinates by projecting the object onto the current camera plane.
For Planar, Cuboid, Cylinder and Sphere projections the position and orientation of the projection shape can be adjusted.
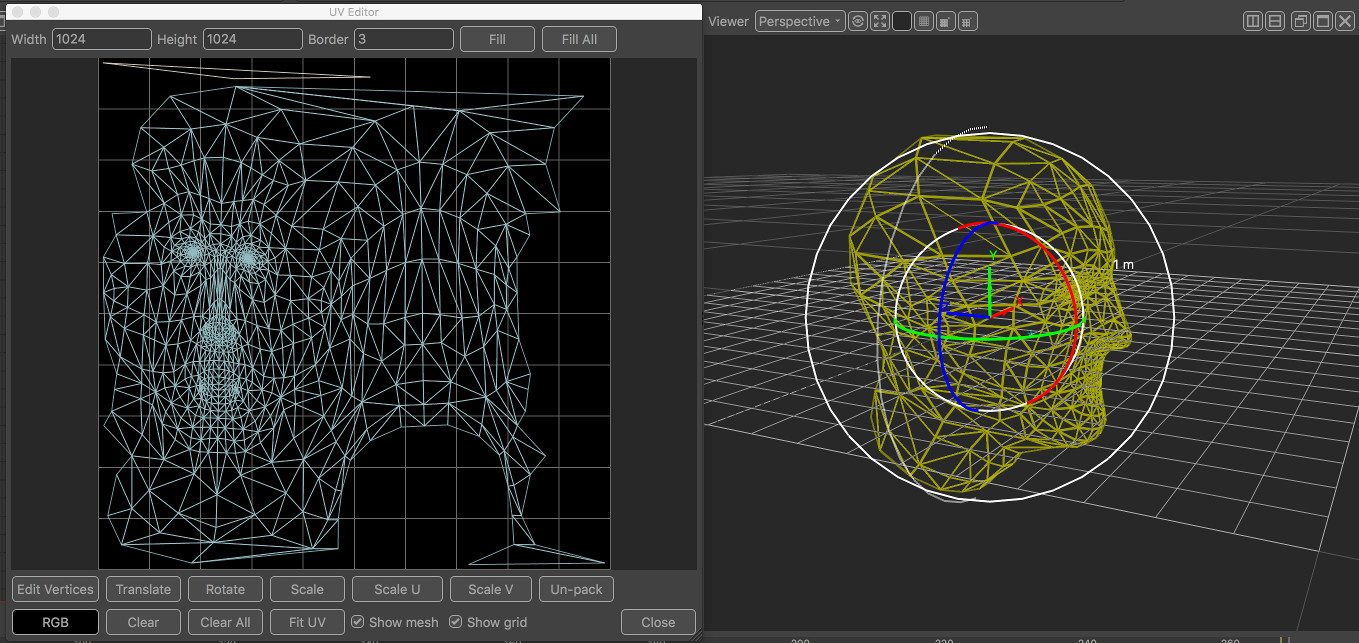
The example below shows a suitable pivot for a Sphere projection (the dotted line indicates the position of the cut that will be applied when un-wrapping the object mesh) along with the UV map generated for the object:
Editing UV maps
Once a UV map has been generated for an object, it can be viewed and edited in a popup window showing the layout of the UV map and various controls that can be used to edit the UV map and change the size of the texture map.
Extracting Textures
Once UV maps have been generated for objects, textures can be extracted from one or more frames of the input clip. The Auto Texture controls can be used to extract textures for all the selected objects by choosing an extraction method from the menu and clicking the Extract button. Different extraction methods exists, namely:
Current frame: Extract textures from the current frame only;
Add frames: Extract textures from all frames (this will generate an animated texture map if one has not already been created for the object);
Best frame per triangle: For each triangle, extract texture from the frame in which it covers the largest number of pixels.
Best frame per group: For each triangle UV group, extract texture from the frame in which the group covers the largest number of pixels.
Once texture maps have been extracted, they can be displayed by changing the Render Style to Textured in the Display controls. Holes in the texture can be filled in the UV Editor.
Painting Textures
In addition to automatic texture extraction, pixels from the input clip can also be painted directly into the geometric object and stored in its texture map. Note that in order to see the texture map as it is painted, the Render Style option in the Display controls must be set to Textured.
Painting can be performed in the Cinema or a perspective/orthographic viewer window, provided the Show Projection control is enabled.
Both single frame and animated textures can be painted.
Controls
Current clip: The input clip that is displayed in the Cinema window.
UV Mapping
UV Projection: The type of UV projection shape that will be used to generate UV maps for selected objects. Options are Custom, Planar, Cuboid, Cylinder, Sphere and Camera.
Generate: Generate UV maps for selected objects, using the projection type specified in the UV Projection menu.
Auto Generate: Automatically generate custom UV maps for all input objects that already have texture coordinates.
Display
Render style: The style in which objects are rendered. Options are Wire-frame, Hidden-line, Facet-shaded, Smooth-shaded, Transparent and Textured.
Texture transparency: The transparency of un-painted texture pixels rendered in the Cinema window when rendering objects using the Textured render style.
Show ground: Toggle display of the ground plane.
Show horizon: Toggle display of the horizon line.
Show ROI: Toggle display of the texture extraction ROI (Region Of Interest).
Show edges: When enabled, triangle edges will be highlighted in the Cinema and 3D viewer windows.
Show projection: When enabled, the current image will be projected onto the objects in 3D viewer windows to guide texture painting.
Show Axes: Toggle display of the X, Y and Z modelling axes for the selected object.
Edit ROI: Display the texture extraction region of interest (ROI) for editing in the Cinema window for editing. Click and drag edges using the left mouse button to adjust the ROI. The ROI limits the region from which texture map pixels will be extracted.
Objects
Name: The name of the object.
Colour: The background colour of the object's texture map
UV Type: The type of UV projection used to generate the object's UV map
From, To: The first and last frames of animated texture maps. When the texture map for an object is not animated, these columns will display N/A.
All / None: Select all or none of the objects from the Objects list.
Remove: Remove UV maps and textures from selected objects.
Move Pivot: Display a translation widget the Cinema and 3D viewer window to allow translation of the pivot used to generate a UV map for the object.
Rotate Pivot: Display a rotation widget in the Cinema and 3D viewer window to allow rotation of the pivot used to generate a UV map for the object.
Edit UV: Display the UV Editor window, allowing the UV map for an object to be edited.
Use animated texture: When enabled, an animated texture map will be created for the object instead of a static texture map.
Paint
Radius: The size of the brush used to paint textures in the Cinema or 3D viewer window.
Softness: The softness of the brush used to paint textures in the Cinema or 3D viewer window.
Paint: Allow manual painting of the texture map for the selected object in either the Cinema or 3D viewer window. Note that in order to paint in the 3D viewer window, the Show Projection display control must be enabled.
Erase: Erase painted pixels from the texture map.
Auto Texture
Extract From: The method used to extract textures for selected objects. Options are Current frame, All frames, Best frame per triangle, and Best frame per UV group.
Extract: Extract texture maps for selected objects using the method specified in the Extract From menu.
UV Editor
The middle and right mouse buttons can be used to zoom and pan inside the UV Editor window.
Width: The width of the texture map.
Height: The height of the texture map.
Border: The maximum distance (in pixels) that will be filled when using Fill or Fill All.
Fill: Fill holes in the current frame by spreading out painted or extracted texture pixels up to the amount in Border.
Fill All: Fill holes in all frames of an animated texture.
Un-pack Separate out the individual groups of of coordinates (according to their material name) into non-overlapping regions , when Custom texture coordinates are being used.
Translate, Rotate, Scale, Scale U, Scale V: Allow each group of triangles to be re-positioned by clicking and dragging with the left mouse button. This can be used to optimise the UV layout for the object to maximise the amount of space used in the texture map. The Edit Vertices button can be used to adjust the position of individual vertices. Holding the Control key whilst editing vertices will mean the position of a single triangle corner is moved independently from the other neighbouring triangles.
Clear: Clear the texture map at the current frame to the current RGB colour.
Clear All: Clear the texture map for all frames of an animated texture.
Fit UV Scale the UV coordinates so they fit into the texture.
Show mesh: When enabled, display the UV mesh.
Show grid: When enabled, display the background grid lines.
Default Keyboard Shortcuts
Keyboard shortcuts can be customised in the Preferences.
|
Generate |
Shift+G |
|
Extract |
Shift+X |
|
All |
Shift+A |
|
Remove |
Shift+E |
|
Move Pivot |
Shift+M |
|
Rotate Pivot |
Shift+N |
|
Edit UV |
Shift+D |
|
Paint |
Shift+P |
|
Erase |
Shift+Z |
|
Edit ROI |
Shift+O |
|
Show Ground |
Control+G |
|
Show Horizon |
Control+H |
|
Show Edges |
Control+E |
|
Show Projection |
Control+P |
|
Show ROI |
Control+O |
|
Show Axes |
Control+A |
|
Next Clip |
C |
UV Editor:
|
Fill |
Shift+F |
|
Fill All |
Control+F |
|
Edit Vertices |
Shift+Z |
|
Translate |
Shift+T |
|
Rotate |
Shift+R |
|
Scale |
Shift+S |
|
Scale U |
Shift+U |
|
Scale V |
Shift+V |
|
Clear |
Shift+C |
|
Clear All |
Control+C |
|
Fit UV |
Shift+I |
|
Show Mesh |
Control+M |
|
Show Grid |
Control+R |